
TL;DR
- Guides convert your digital plan into a physical reference that keeps implants close to the intended position and angulation.
- The quality of data, treatment plan and communication with your lab matter more than the 3D printer alone.
- Clear protocols with your lab shorten surgery time, lower stress and support more predictable outcomes for everyday cases.
NovaDent Labs fabricates implant restorations and surgical guide solutions for dental practices across Australia.
View Implant Services →
Submit a Case →
Implant surgical guides help translate a prosthetic driven digital plan into calm, predictable surgery.
For many clinicians, placing an implant with an implant surgical guide feels like switching from driving without GPS to following turn by turn directions. Your hand skills are still doing the work, but the path feels calmer and more repeatable. At the same time, questions come up: when does a guide genuinely change outcomes, what exactly happens at the lab bench, and how can you be confident the guide in your hand reflects the plan in your head?
This article walks through how a modern digital lab supports guided surgery, where guides help most, and how to get the best from each case with a practical, step by step approach.
This content is for dental professionals and does not replace your own clinical judgement or formal training.
What is an implant surgical guide?
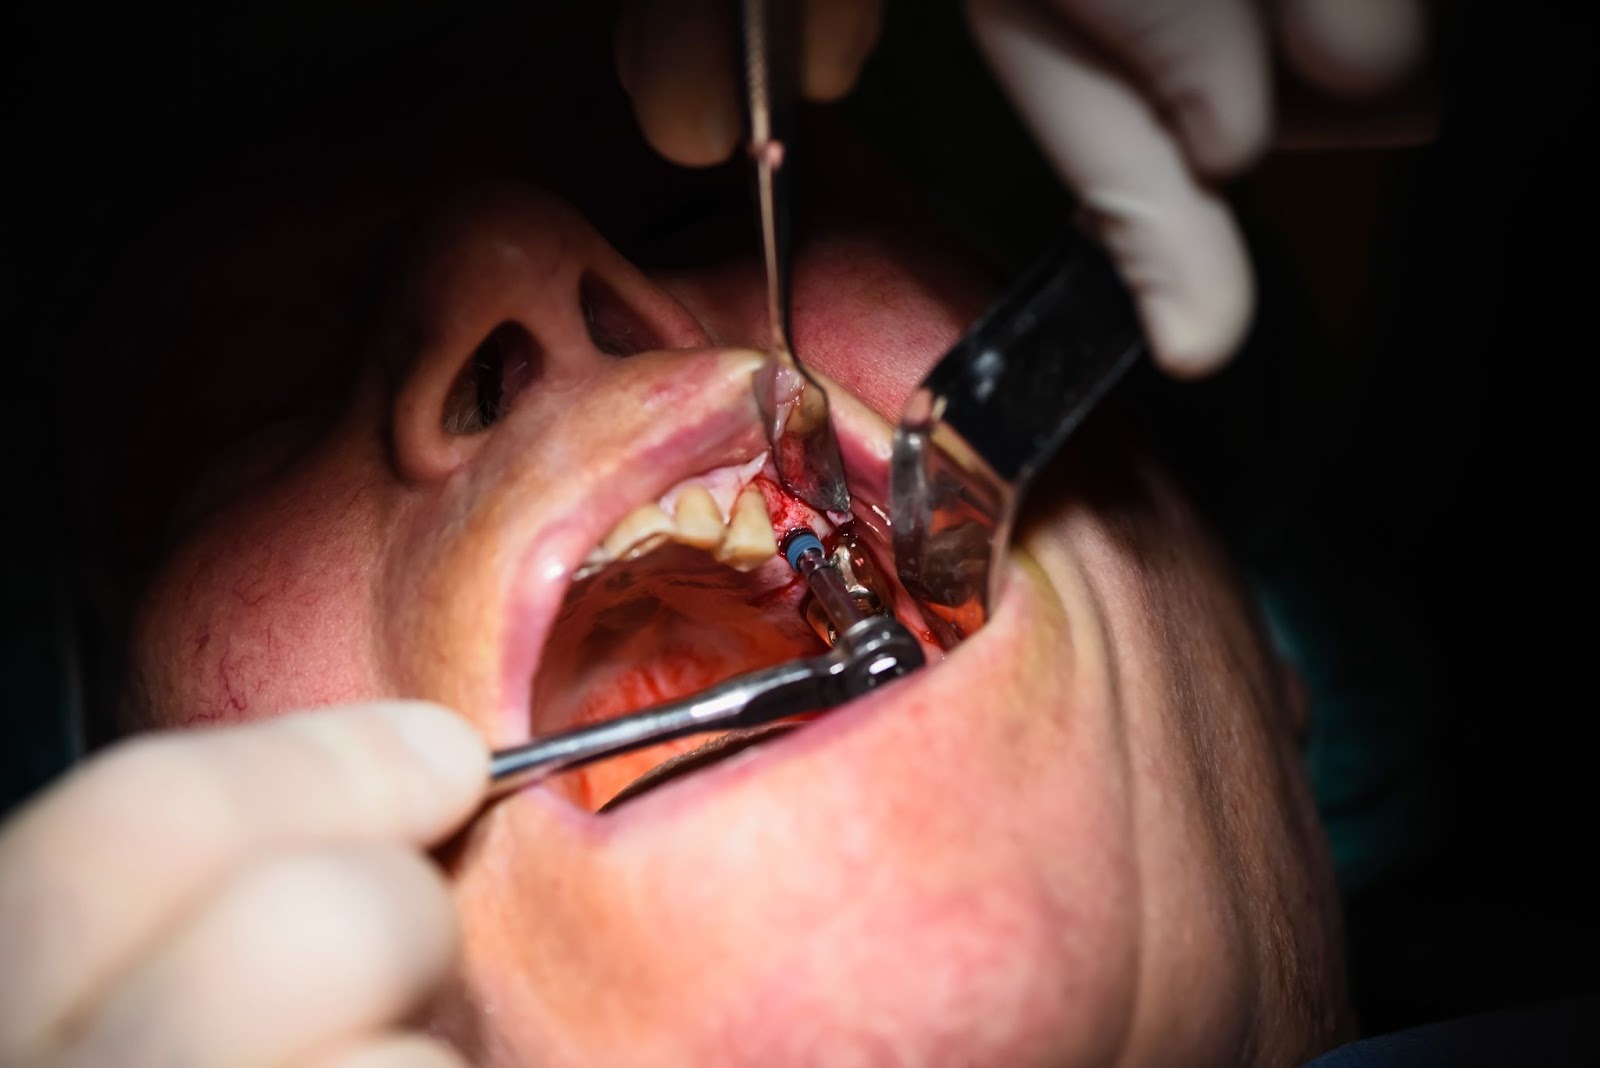
At its core, a guide is a custom device that transfers your virtual implant plan into the patient’s mouth during surgery. It controls the position, angulation and often the depth of the osteotomy by directing your drills through metal or polymer sleeves.
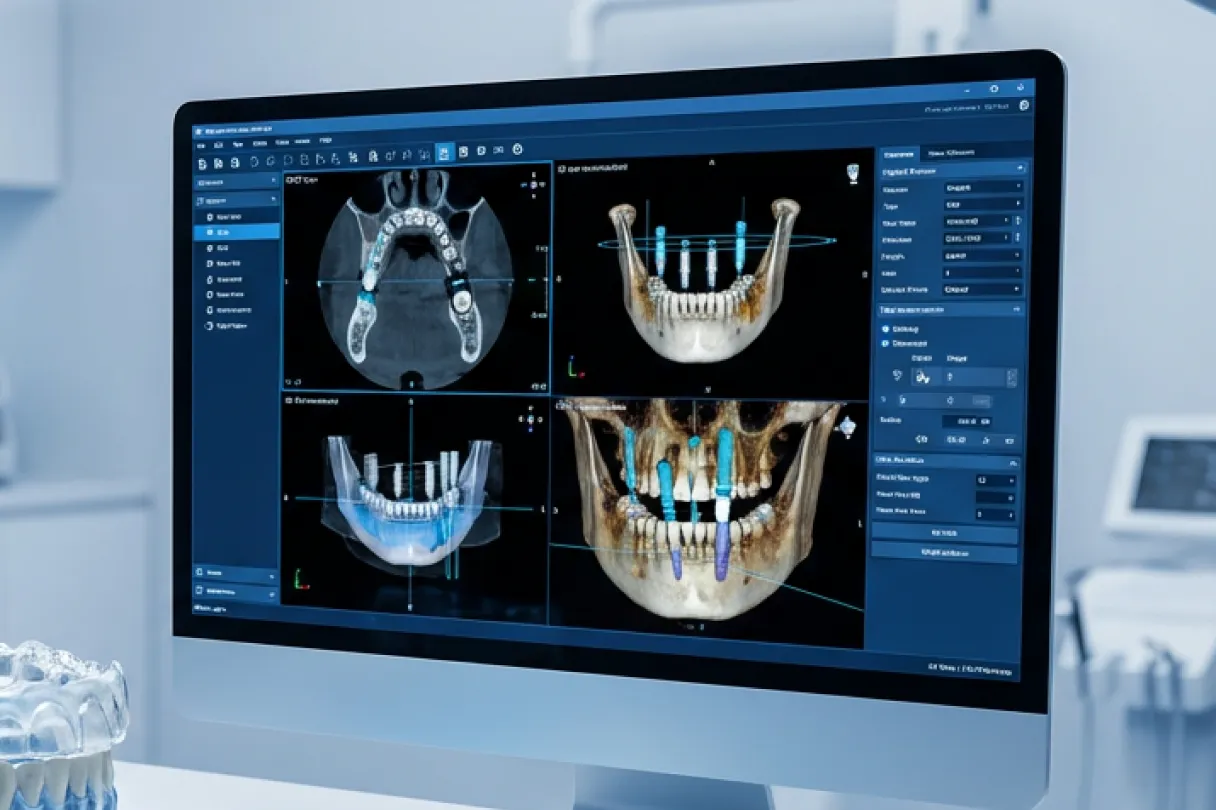
Modern guides are typically designed from a combination of CBCT data (DICOM files) and surface scans (STL files from an intraoral scanner or model scan). The lab merges these datasets, plans fixture positions in relation to bone, soft tissue and the final prosthetic, then designs a tooth, mucosa or bone supported template that seats in a stable, reproducible way.
Compared with freehand placement, guided approaches have been shown in multiple systematic reviews to reduce lateral deviation and angulation error, especially in limited access sites and multi unit cases. For references, many clinicians start with summaries on PubMed.
When should you consider a surgical implant guide?
Not every implant needs a guide, and most clinicians build their own rules of thumb over time. In practice, a guide adds the greatest value when the margin for error is small or the prosthetic demands are high.
- Anterior aesthetics: where millimetres mean the difference between a natural emergence profile and a compromised result.
- Limited bone volume: narrow ridges, proximity to the sinus, nasal floor or inferior alveolar nerve.
- Multi unit and full arch cases: where parallelism and restorative space are difficult to judge freehand.
- Immediate placement/immediate load: matching the fixture to existing sockets and the planned provisional is much smoother with a guide.
- Less familiar implant systems or drills: a guide can take some pressure off when you are still becoming fluent with a kit.
For straightforward posterior singles in generous bone, many practitioners still work freehand. The key is consciously choosing when a surgical implant guide will support the treatment plan rather than using a guide by habit.
How labs fabricate an implant surgical guide (step by step)
From the lab side, implant surgical guide fabrication is less about “pressing print” and more about stacking precise, checked steps. Here is how a typical case flows at a digital lab like NovaDent.
Digital labs merge CBCT and surface scan data, then design and fabricate each implant surgical guide with calibrated workflows.
1. Data collection and verification
- CBCT scans in the correct field of view, exported as DICOM.
- Surface data from an intraoral scan or a well fitting model.
- Bite registration and any wax ups or diagnostic setups (digital or physical).
The lab team first inspects the datasets for artefacts, missing scans or obvious mismatch, then confirms that the CBCT and scan represent the same occlusal situation.
2. Data fusion and prosthetic‑driven planning
Using planning software, DICOM and STL files are aligned. Implants are positioned relative to the proposed restoration, bone availability and anatomic structures. This stage often includes back and forth with the clinician via screenshots, online meetings or annotated PDFs.
3. Guide design
Once the plan is approved, the lab designs the guide itself: support type, thickness, window placement, sleeve choice (system specific, universal or guided kit sleeves) and offset values. Access, irrigation and soft tissue management are considered at this stage.
4. Manufacturing and post processing
Guides are then 3D printed in biocompatible resin and post cured according to manufacturer instructions, or milled where indicated. Sleeves are bonded or pressed in with calibrated jigs. Fit is checked on a printed or analogue model and, if required, minor adjustments are finished by hand.
5. Quality checks and documentation
Before dispatch, labs document the final plan, provide drill sequence charts and label the guide clearly (for example, patient initials, jaw, tooth region). Many clinicians appreciate having these documents accessible in their practice management system or scanner connection guide.
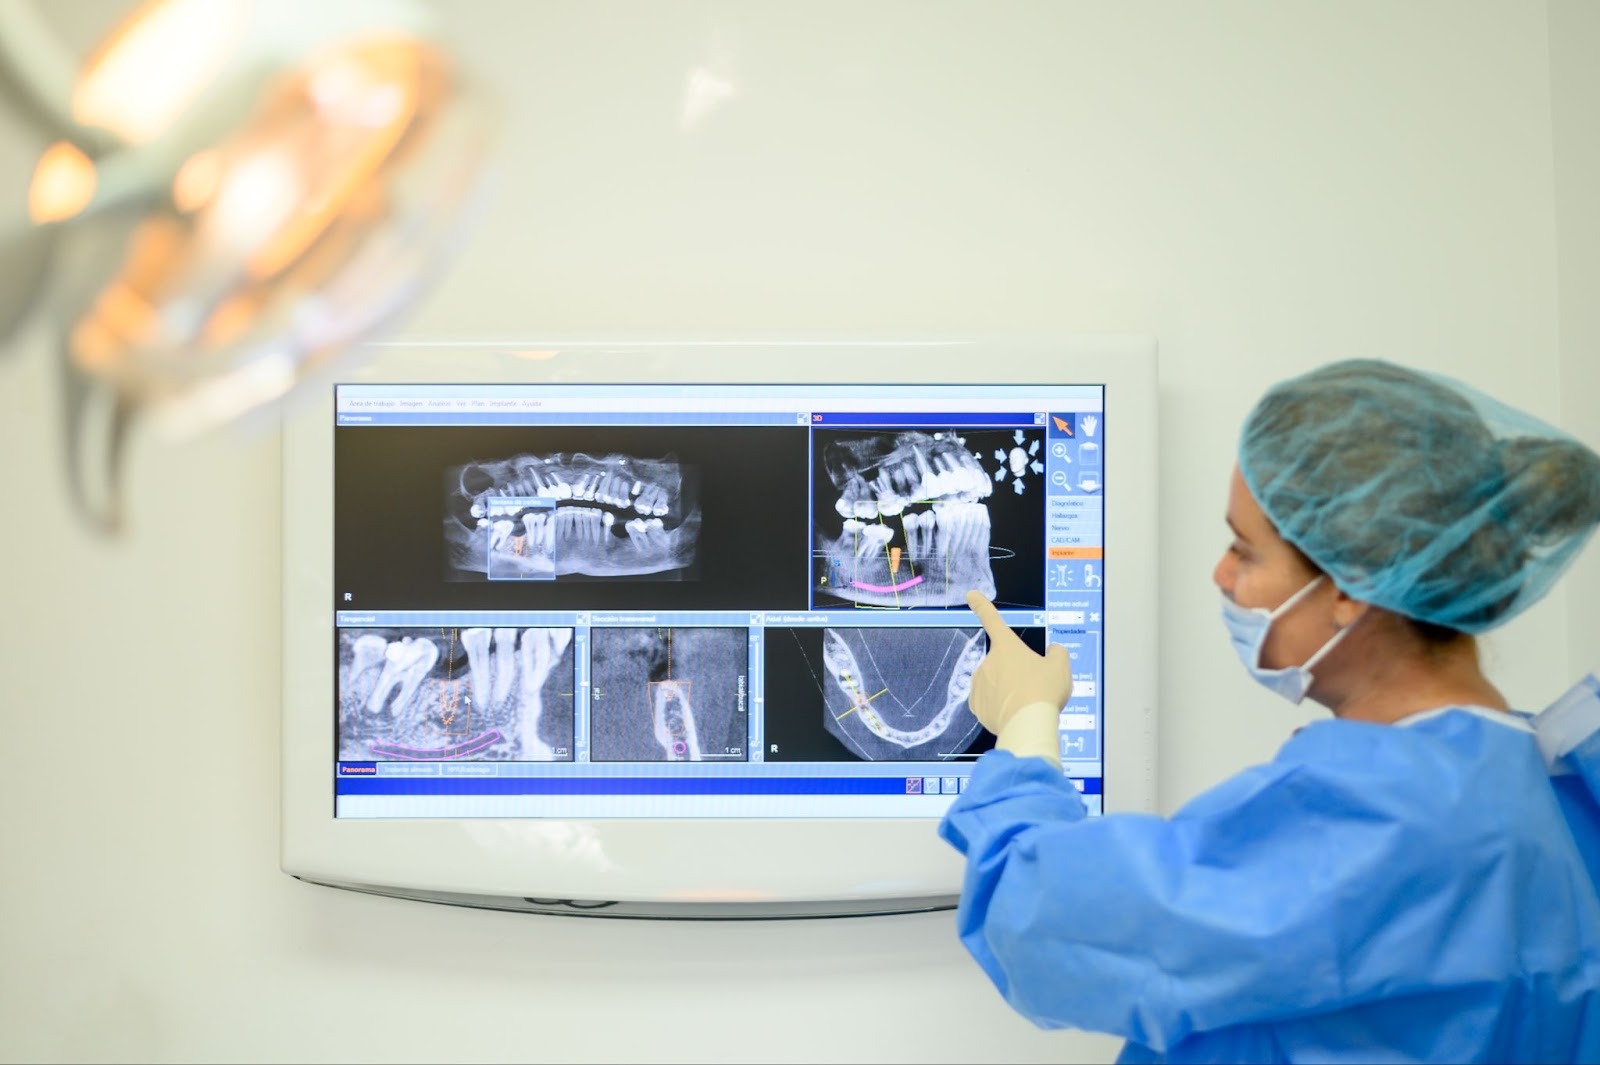
How digital labs support implant placement accuracy
On paper, guided surgery looks simple: “plan, print, place”. In reality, accuracy depends on the chain of small decisions made from the first scan onwards. At NovaDent, we describe this as the Data Design Delivery chain: capture clean data, design prosthetically, and deliver a stable, verified guide to surgery.
- Standardised protocols: clear intake forms for CBCT and scans minimise guesswork and re‑planning.
- System specific expertise: labs that work daily with multiple implant systems understand kit tolerances, sleeve offsets and typical quirks.
- Consistent verification: visual checks of guide fit on a printed model, and digital cross sections comparing planned and actual sleeve positions.
- Clear documentation: accurate drill keys, depth stops and sleeve heights mapped to your chosen kit reduce chairside mental load.
Research consistently shows that well‑executed guided surgery tends to reduce linear and angular deviations compared with freehand placement, particularly in demanding sites. For specific deviation figures and literature references, see the FAQ on accuracy.
“The guide is only as accurate as the planning conversation that produced it.”
At NovaDent, these checks sit on top of ISO 13485‑aligned workflows and TGA oriented manufacturing processes, so each guide runs through the same quality steps rather than ad‑hoc decisions at the bench. Breaks anywhere in that Data Design Delivery chain are where most avoidable errors creep in.
Practical collaboration tips for clinicians and your lab
Guided cases feel smoother when clinician and lab work as one team rather than two separate silos. A few structured habits make the biggest difference.
Consistent communication between the clinic and lab keeps each implant surgical guide aligned with the restorative plan.
- Share the restorative end point early: send photos, mock ups or provisionals, plus shade and relevant medical or periodontal context so the lab understands the clinical constraints.
- Be explicit about systems and kits: confirm which implant system, guided surgery kit and provisional approach you plan to use so the guide and documentation match your setup.
- Review complex plans together: for multi unit, full arch or high risk sites, schedule a brief online or phone review rather than relying only on static screenshots.
- Close the feedback loop: after surgery, share notes, photos or scans so future guides and restorations can be fine tuned to your preferences.
If you are building a more digital implant workflow, resources such as the Australian Dental Association’s technology guidance can help frame your internal protocols, which your lab can then align with.
Common pitfalls with guides (and how labs help reduce them)
Most problems with guides trace back to predictable themes. Recognising them makes it easier to address them with your lab at the planning stage.
Stable seating, access and irrigation all influence how accurately an implant surgical guide performs on the day of surgery.
- Unstable guide seating: undercuts, mobile teeth or limited support can compromise stability. Discuss whether tooth, tissue or bone supported designs are safer, and consider verification windows.
- Access and mouth opening: posterior sites and long drills can clash with opposing dentition. A lab familiar with your system can usually flag this early and adjust guide design or drill sequence.
- Soft tissue and irrigation issues: without adequate relief or windows, soft tissue may prevent full seating and restrict irrigation. Virtual soft tissue design and generous windows help keep surgery controlled.
- Mismatched expectations about what is guided: assuming a fully guided approach when the kit allows only pilot guidance can cause frustration. Clear notes from the lab on what is guided (pilot vs full sequence) reduce that risk.
A short debrief with your lab after any challenging guide case often pays dividends across the next ten.
Working with NovaDent Labs on guided cases
NovaDent Labs was built as a digital first lab, so guided surgery plugs naturally into our crown, bridge and implant restoration workflows. In most cases, we can work with DICOM data from common CBCT units and STL files from major intraoral scanners, and our implant‑supported prosthetics are compatible with all major implant systems used in Australian practices.
For clinicians, the day to day experience matters just as much as the guide itself. That is why we offer:
- Case planning support from technicians who work closely with a practising dentist and educator.
- Integration with your restorative plan, from single units through to full arch prostheses.
- Clear turnaround expectations (typically around 5 to 9 business days of lab time for most guides, once planning is signed off, depending on case complexity and shipping).
- Nationwide logistics from our Sydney lab, so regional practices can still run guided workflows confidently.
As a composite example, a regional GP dentist new to guided surgery might ask us to support a mandibular premolar and molar case close to the inferior alveolar nerve. After sharing CBCT and intraoral scans, we would co-plan implant positions, design a tooth supported guide and supply a simple drill key chart matched to the clinician’s kit. In feedback, clinicians in similar scenarios often report that the guide seats predictably, the procedure feels calmer than comparable freehand cases, and they feel more confident taking on the next high‑stakes guided case.
If you would like to standardise how you handle guided cases with one primary lab partner, you can request our RX or discuss protocols with our team. You may also find it useful to review related content such as our intraoral scanner connection guide and crown and bridge services.
Summary:
- Think prosthetically first, then let the guide translate that plan to the surgical field.
- Data quality, consistent communication and system specific knowledge all influence final accuracy.
- Use guides where the anatomical or aesthetic stakes are high, rather than by habit alone.
- Structured collaboration with a digital lab partner can make guided surgery feel routine instead of stressful.
NovaDent Labs fabricates implant restorations and surgical guide solutions for dental practices across Australia.
View Implant Services →
Submit a Case →
If you are ready to put a more structured guided workflow in place, start with one or two well‑selected cases, agree clear protocols with your lab, and build from there.
FAQs
Do I need a guide for every implant?
No. Many posterior singles with generous bone and clear anatomy are placed predictably freehand by experienced clinicians. Guides show the greatest benefit where the anatomy is unforgiving, aesthetics are demanding or multiple fixtures must relate precisely to each other.
Can I use my existing CBCT and scanner with your guides?
In most cases, yes. NovaDent accepts DICOM files from common CBCT units and STL files from major intraoral scanners. If you are unsure whether your system integrates smoothly, the team can confirm file formats and share a simple submission checklist.
How accurate are guides compared with freehand placement?
Published data varies by study, system and operator, but the overall trend is consistent: guided surgery tends to reduce both linear and angular deviations compared with freehand placement, particularly in more challenging sites. Large meta analyses of static computer aided implant surgery report mean three‑dimensional deviations of roughly 1.1–1.2 mm at the implant entry point, about 1.4 mm at the apex and around 3.5° of angular deviation between the planned and placed implant position, which is generally smaller than values seen with freehand placement. For example, one systematic review and meta analysis of static computer aided implant surgery reports these mean deviations in clinical studies; a summary is available on PubMed.
Can the same lab handle both my guides and final implant restorations?
Yes, and many practices in Australia prefer this. When the same lab handles the guide, provisionals and final restorations, you gain continuity in occlusal schemes, material choices and aesthetics. At NovaDent, our removable prosthetics and fixed teams collaborate closely, which is particularly helpful in full‑arch and hybrid cases.
Related Posts
You may also be interested in

TMJ Splint vs Night Guard: What’s the Difference?
How to Clean a Mouth Guard Properly Without Damaging It
Multi Unit Abutment Explained: Purpose, Benefits & Applications

NovaDent Has Arrived.
Previously VTS Dental Labs.
Same team
Same standards
New identity
Visit our new website