


Discussing bone grafting within the context of the final implant restoration helps align patient expectations from the start.
Most of us were taught bone grafting in terms of millimetres: gain 3 mm of width here, 4 mm of height there, fill the socket so the ridge stays stable. But when a patient returns a year later, and the scan looks “ideal” while the screw‑retained crown still feels like a compromise, it raises a fair question: what is a dental bone graft really rebuilding for your implant case?
This article looks at bone grafting through a prosthetic‑first lens, with the digital lab sitting beside you in the planning room rather than at the end of the supply chain. The aim is simple: more cases where the graft, the implant position, and the final restoration line up beautifully, and fewer cases where you’re compensating with angulated abutments, pink porcelai,n or heroic adjustment at fit.
TL;DR
- In implant dentistry, bone grafts should rebuild the planned prosthetic envelope, not just replace lost volume.
- Starting with the ideal crown position and emergence profile guides, where you regrow bone and how much.
- CBCT data, intraoral scans, and a lab‑driven digital wax‑up let you plan grafts, implant,s and restorations as one system.
- Clear lab communication and shared digital planning software turn grafting from a “best guess” into a repeatable protocol.
What is a bone graft in dentistry for implants?
At a basic level, a dental bone graft is a biomaterial placed to maintain or increase alveolar bone volume so you can position an implant in native or regenerated bone. That might be a socket graft after extraction, a lateral ridge augmentation, a sinus floor elevation or a vertical onlay.
The graft material might be autogenous, allogenic, xenogenic, synthetic or a mix, usually combined with a membrane for guided bone regeneration. The biological goal is familiar: create a scaffold that remodels into vital bone around the implant, with enough density and contour to support long‑term loading.
Good reviews of these techniques sit in the ITI consensus reports and similar guidelines from specialist bodies such as the American Association of Oral and Maxillofacial Surgeons.
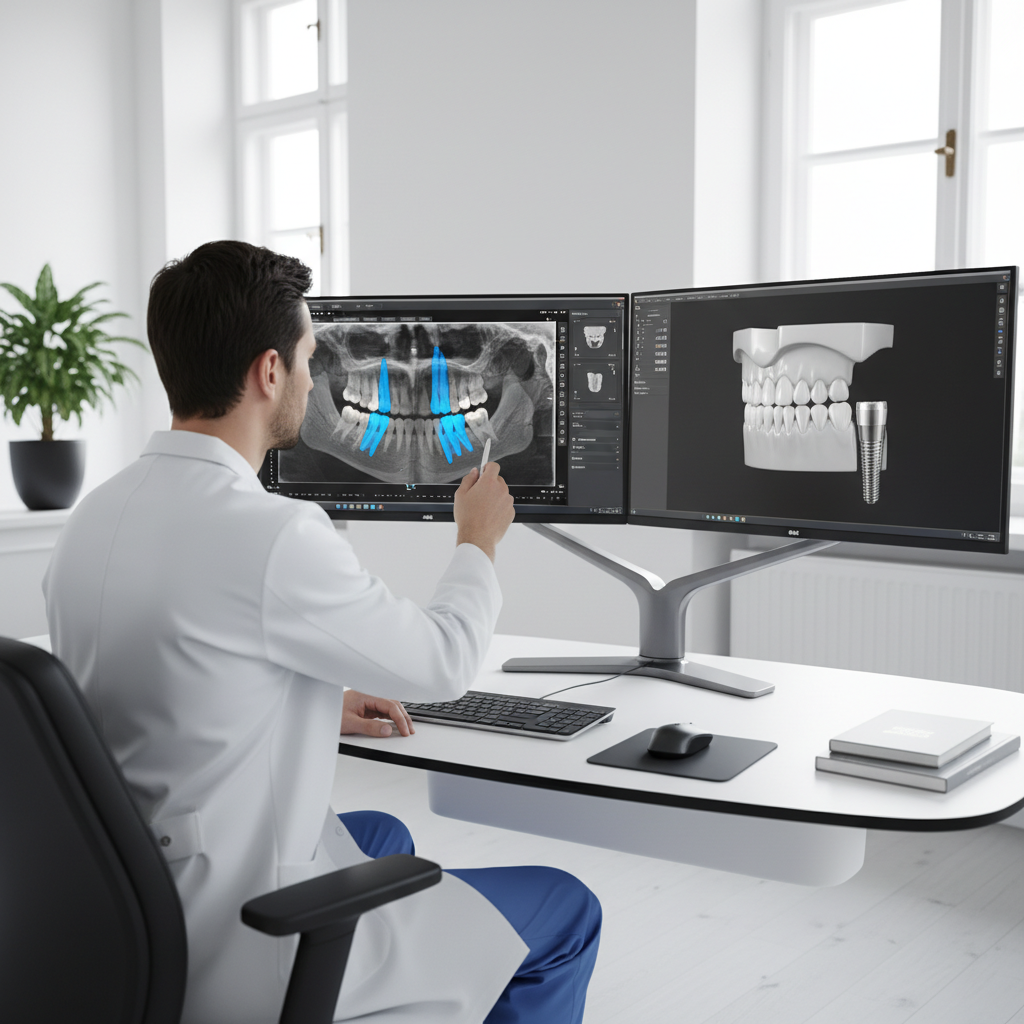
CBCT data combined with a digital wax‑up helps you visualise how bone grafting, implant position, and the final crown relate to each other.
For the restorative team and la,b though, that’s only half the story. They need the graft to support a specific implant position, platform depth, soft tissue architecture, and prosthetic design.
What is a bone graft for teeth really rebuilding?
When a patient asks, “What is a bone graft for teeth actually doing?”, they’re usually thinking structurally: “You’re rebuilding my jaw so the implant has something to sit in.” Clinically, you’re rebuilding something more precise: space for a screw access channel, room for a proper emergence profile, and a platform that lets you use standard components rather than compromises.
In practical terms, a successful graft for a single‑tooth implant in the aesthetic zone should rebuild:
- Enough horizontal width for a prosthetically driven implant position within the envelope of the planned crown.
- A vertical level that lets you place the implant platform subcrestally without pushing the crown too far incisally.
- A contour that supports papillae and buccal soft tissue thickness, not just a flat ridge on the scan.
For posterior segments, the focus often shifts to screw‑retained access in the occlusal table, cleansable emergence, and clearance for opposing teeth or prostheses.
Prosthetic‑first planning: start with the crown, not the defect
A graft planned from the CBCT alone tends to follow the defect. A graft planned from a digital wax‑up follows the future crown. That single difference is where many predictable implant cases are won.
In a prosthetic‑first workflow, you and your lab first agree on the ideal tooth position and contour using a digital wax‑up or mock‑up. The wax‑up can be created directly from your intraoral scan or conventional impression, with the lab sending back a proposal file you can review chairside or in your planning software.
- The wax‑up defines the ideal crown position and occlusion.
- The lab aligns the wax‑up STL with the CBCT (cone beam CT) DICOM data.
- The implant position is chosen inside that envelope, then the required graft volume is planned around it.
Now the question shifts from “How much bone can I gain here?” to “What do I need to regrow so this crown sits where it should?” That mindset helps both the surgeon and the lab make more consistent decisions.
Common bone graft scenarios and prosthetic implications
1. Immediate extraction sockets
For anterior immediate implants with simultaneous grafting, the lab’s wax‑up guides:

Reviewing bone graft options as a team—surgeon, restorative dentist and lab—clarifies the prosthetic implications of each scenario.
- Implant angulation so the screw access exits palatally.
- Buccal gap grafting to support the planned soft tissue profile.
- Interproximal bone levels that frame future papillae.
2. Horizontal ridge augmentation
When horizontal width is lacking, the prosthetic plan helps you decide whether to:
- Expand the ridge enough for a standard‑diameter implant in ideal position.
- Settle for a narrower implant in a slightly compromised axis.
- Stage the case and use a removable or bonded provisional linked to the wax‑up between surgeries.
3. Vertical augmentation
Vertical grafting brings extra risk and time. Here, the lab can show you on the virtual model how much prosthetic crown height you can accept before compromising aesthetics or biomechanics. Sometimes, a well‑planned crown‑to‑implant ratio and occlusal scheme can spare the patient a major vertical procedure.
4. Sinus grafting
In the posterior maxilla, the prosthetic plan clarifies whether a sinus floor elevation is needed to keep the implant in the ideal mesio‑distal and bucco‑palatal position, or whether slightly shorter implants with a wider diameter still suit the planned occlusion. Evidence‑based protocols from groups such as the International Team for Implantology (ITI) can guide that decision alongside your own experience.
Digital workflows that connect the surgeon, restorative dentist, and lab
The more your data streams line up, the easier it is for the graft, implant, and prosthesis to line up. A typical lab‑integrated workflow at NovaDent looks like this:
The data you send
- CBCT DICOM files with a clear field of view.
- Intraoral scans (or scanned models) of the arch and occlusion.
- Photographs for shade and soft tissue reference.
- A short note on the restorative plan: single tooth, short span bridge, full‑arch, screw‑retained vs cement‑retained.

A lab‑integrated digital workflow ties together bone graft planning, implant positioning, and the final prosthetic design.
If you already work with digital impressions, you can send files directly from your scanner to the lab. NovaDent accepts all major scanner formats and can build the wax‑up and guide design inside that ecosystem, reducing export and import friction.
Surgical guides and stackable systems
Once the team agrees on the implant position relative to the wax‑up, the lab can design:
- Tooth‑ or mucosa‑supported guides for single units and short spans.
- Stackable systems for full‑arch cases that sequence bone reduction, implant placement, and prosthetic seating.
- Provisional restorations based on the same design, ready to insert on the day of surgery.
The same files then flow into the final restoration design, whether that is a screw‑retained zirconia bridge, a single lithium disilicate crown on a titanium base, or a full‑arch hybrid prosthesis. That continuity is what keeps surprises low at the fit appointment.
For more details on how NovaDent handles intraoral scans and CAD/CAM workflows, see our overview of digital implant restorations.
Communication checklist for your lab on graft + implant cases
Many frustrations with grafted sites show up not because the biology failed, but because the lab had to guess. A short, consistent communication checklist goes a long way:
- Share the restorative endpoint. Single crown, three‑unit bridge, full‑arch, locator‑retained overdenture, etc.
- Define your preference. Screw‑retained wherever possible, or cemented in specific zones only.
- Flag the timeline. Staged approach, immediate placement, or provisional at surgery.
- Note risk factors. Heavy bruxism, thin phenotype, history of periodontal breakdown, smoking.
- Ask for a digital wax‑up proposal if you don’t already have one.
- Confirm component systems so the lab designs within your implant platform catalog.
Building this checklist into your referral templates or your digital case submission routine helps every grafted implant case follow the same playbook.
When graft volume looks good, but the prosthetic result struggles
Think of a common story. A lateral incisor was lost, a socket graft was placed, and six months later the CBCT shows a generous ridge. The implant goes in comfortably. Yet at restoration, the screw access exits near the incisal edge, the cervical contour feels bulky and one papilla refuses to cooperate.
Radiographically, the graft did its job. Prosthetically, it left you working around an implant that sits a touch too labial and a fraction too coronal. If the initial graft had been planned from a wax‑up, you might have chosen a slightly different implant axis, a more generous palatal socket fill or even a staged approach with a bonded provisional linked to the final tooth position.
A “good” graft on the scan is only a success if it lets you place the implant and restoration where they were meant to be in the first place.
Reviewing a few of your own cases like this with your lab—especially where the radiographs and the prosthetic compromise don’t quite match—can sharpen your shared planning instincts more than another lecture ever will.
How NovaDent Labs supports prosthetic‑first bone graft planning
As a Sydney‑based digital lab working with clinicians across Australia, NovaDent sits in that space between biological possibility and prosthetic reality. Our role is not to tell you how to graft, but to show what each grafting option means for components, emergence profiles and long‑term maintenance on the restorative side.
In grafted implant cases, our team can help you with:
- Digital wax‑ups that define the target tooth position before you lift a flap.
- CBCT/intraoral scan alignment and prosthetically driven implant planning files.
- Guide design and manufacture for single, short‑span and full‑arch cases.
- Provisional and definitive implant restorations that track the same design from start to finish.
If you’d like to standardise this workflow in your practice, you can request a price list or contact the team to walk through a recent case. Many clinicians start with one or two “problem” cases and build a shared protocol from there.
For a broader overview of our implant and restorative services, visit our pages on implant restorations and crowns and bridges.
Key takeaways for predictable digital implant restorations
- When you answer “what is a bone graft in dentistry?” for yourself, include the prosthetic endpoint in that definition, not just the defect.
- Start with the crown, then plan implant position, then plan the graft. The digital wax‑up is the anchor for these decisions.
- Use CBCT, intraoral scans and lab‑driven planning to align surgical and restorative goals.
- Give your lab consistent information on every grafted implant case so they can support your plan rather than guess.
- Review “near‑miss” cases with your lab; they often teach more than the perfect ones.
This article is intended for dental professionals as general information and does not replace formal training or case‑specific clinical judgement. Patient outcomes vary, and each case should be planned and executed according to current guidelines, evidence, and your own expertise.
Related Posts
You may also be interested in

TMJ Splint vs Night Guard: What’s the Difference?
How to Clean a Mouth Guard Properly Without Damaging It
Multi Unit Abutment Explained: Purpose, Benefits & Applications

NovaDent Has Arrived.
Previously VTS Dental Labs.
Same team
Same standards
New identity
Visit our new website