
You prep a lower molar, scan, send the case – and the zirconia crown still seats high. After repeated adjustment the functional cusp looks thin and you start questioning its strength; in scanner‑first workflows the on‑screen design can look ideal, but without enough reduction the lab must steal thickness from exactly where the load is highest. Thinking about zirconia crown thickness earlier in the workflow helps you avoid that situation.
This article gives practical thickness guidelines for zirconia crowns in scanner‑based workflows, with numbers you can read straight off your intraoral scanner. The aim is fewer remakes, minimal chairside adjustment, and crowns that stay strong years after fit, plus a quick Scanner‑First Zirconia Thickness Checklist to run before you hit “Send”.
TL;DR: Thickness targets before you hit “Send”
- Everyday posterior monolithic zirconia: aim for 1.0–1.5 mm occlusal and around 1.0 mm axial; give the lab a 0.5–0.8 mm rounded chamfer/shoulder.
- Translucent / aesthetic zirconia (posterior or anterior): treat it more like glass‑ceramic: 1.2–1.5 mm occlusal or incisal, 1.0–1.2 mm axial.
- Implant crowns with screw channel: if you can’t gain much occlusal space, keep the axial wall at ≥1.2 mm where possible for fracture resistance.
- Layered PFZ: think in two parts – roughly 0.5 mm zirconia framework plus 0.8–1.0 mm porcelain; that means at least 1.3–1.5 mm total in functional zones.
- Scanner‑first tip: use your scanner’s reduction or clearance map to confirm those numbers before you submit the scan instead of expecting the lab to “make it work” in software.

A scanner‑first view: reviewing zirconia crown thickness on a 3D model before you hit “Send”.
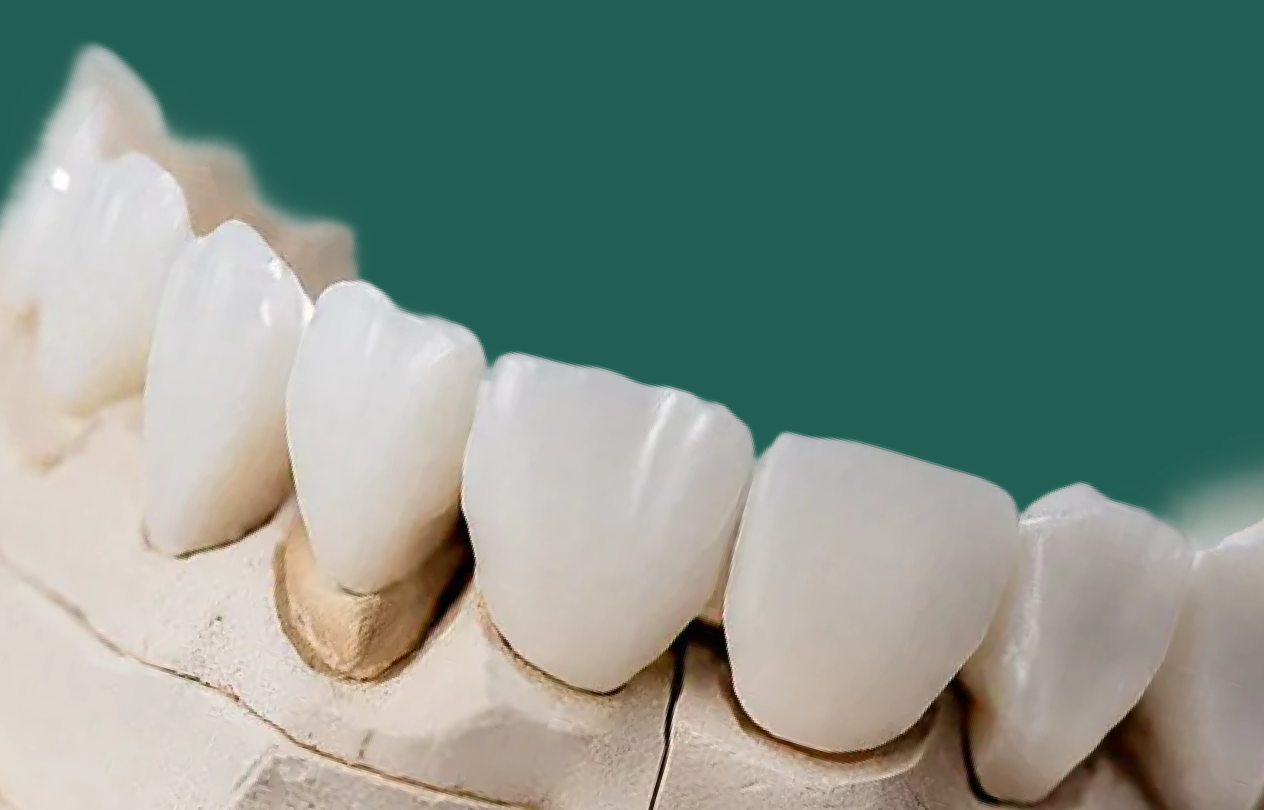
Posterior monolithic zirconia: 1.0–1.5 mm occlusal thickness, ~1.0 mm axial, and a 0.5–0.8 mm chamfer give a reliable safety margin.
Table of contents
- Scanner‑first workflows: what changes, what doesn’t
- Recommended zirconia thickness at a glance
- Minimum thickness for zirconia: what evidence shows
- Preparation guidelines to hit those numbers
- Using your intraoral scanner to check reduction
- Common thickness issues we see at the lab
- Working with NovaDent on zirconia and scanners
- Scanner‑First Zirconia Thickness Checklist
- Zirconia thickness FAQs
Scanner‑first workflows: what changes, what doesn’t
Digital scanners change how you record and share a prep, but zirconia still needs enough thickness to stay strong; scanner‑first workflows simply give you more control over where that thickness ends up. If you are still setting up digital sending, our scanner connection guide walks through connecting major intraoral scanners to NovaDent.
- Overlay pre‑op and prep scans to see exactly how much structure you have removed on each cusp.
- Use colour‑coded clearance maps to see whether you’ve truly gained 1.5 mm in the fossa or only 0.8 mm on that working cusp.
- Share STL/PLY files with your lab so technicians can give you reduction feedback before milling via the online RX form.
Recommended zirconia thickness at a glance
The table below summarises practical zirconia thickness targets that leave a realistic safety margin after occlusal adjustment.

Translating zirconia crown thickness numbers into chairside discussions with patients.
These figures are consistent with many manufacturer instructions and independent prep guides, which commonly quote monolithic zirconia occlusal minimums around 0.8–1.0 mm and higher values for translucent or layered systems; always cross‑check against the specific zirconia you and your lab are using.
Minimum thickness for zirconia: what the evidence says
Literature and manufacturer IFUs show a clear pattern: high‑strength posterior monolithic zirconia can survive near stated minimums around 0.8–1.0 mm, but as zirconia becomes more translucent or layered, recommended thickness rises toward 1.2–1.5 mm, especially in aesthetic zones. Safco zirconia prep guide.
Those brochure minimums assume perfect fit and loading. In real scanner‑first workflows you usually want a few tenths of a millimetre more, and for implant‑supported crowns with a screw channel it is often safer to prioritise a thicker axial wall (around 1.2 mm) over chasing tiny gains in occlusal thickness. Implant thickness study.
Preparation guidelines to hit those thickness numbers
Adequate zirconia thickness is still won or lost at the handpiece. Here’s how to hit the numbers above; for broader scanner‑first crown prep tips beyond zirconia, see our scanner-first crown prep guide.
1. Occlusal reduction: think anatomy, not just numbers
Many experienced educators suggest treating zirconia occlusal reduction much like full‑metal: about 1.5 mm on functional cusps for posterior crowns. Dental Economics zirconia article. Depth‑cut burs and reduction guides (digital or silicone) help keep you honest, especially on second molars where access is tight.
- Place depth grooves at 1.5 mm in the central fossa and functional cusp tips.
- Follow the tooth’s natural anatomy rather than flattening everything into a plateau.
- After gross reduction, refine with finer burs to remove sharp facets that concentrate stress.
Most labs will relieve occlusal contacts slightly; if you only provide ~1.0 mm of space and we remove 0.3–0.5 mm in CAD/CAM, the zirconia ends up thin in a high‑load zone, so it is safer to create about 1.5 mm clearance and maintain bulk throughout.
2. Axial reduction and taper
For most posterior zirconia crowns, aim for ~1.0 mm uniform axial reduction with a total occlusal convergence in the 10–20° range. Clinical and manufacturer guidance for zirconia frequently quotes axial minimums between 0.5 and 1.0 mm; in scanner‑first practice, sitting closer to 1.0 mm gives better retention and material thickness. Hocera zirconia prep guide.
Two small habits help a lot:
- Smooth, continuous walls: step‑like undercuts force the lab to trim thickness just to obtain draw.
- Rounded internal line angles: sharp corners act as stress raisers in ceramic and make it harder for the software to generate a clean internal surface.
3. Finish lines: thickness and scan‑friendliness
Zirconia’s strength means it can survive very thin at the margin, and some systems even list feather‑edge options. Spear zirconia guidance. In scanner‑first workflows, though, ultra‑thin knife‑edge margins are harder to read on colour scans, tougher to mill accurately, and more sensitive to minor impression defects.
In day‑to‑day cases, a 0.5–0.8 mm rounded chamfer or light shoulder usually gives the best balance of strength and scan clarity. For translucent zirconia in aesthetic zones, step that up to roughly 0.8–1.0 mm so the material isn’t forced to an eggshell at the cervical.
Your scanner will reward supragingival or equigingival margins with clean, crisp data. When margins must be subgingival, invest a minute in retraction cord or tissue management before scanning; most remakes we see tied to “poor fit” start from margins that weren’t clearly visible on the scan rather than from CAD/CAM errors.
Using your intraoral scanner to check reduction
Overlay pre‑op and prep scans
Most current scanners or design platforms let you overlay the pre‑op and prep to show how much reduction you’ve gained at each point. Use this to check:
- Functional cusps on molars – do you truly see ~1.5 mm at the tip?
- Marginal ridges – have you preserved enough height while still creating space for contacts?
- Incisal edges on anteriors – is there enough room for translucency, not just a flat shelf?
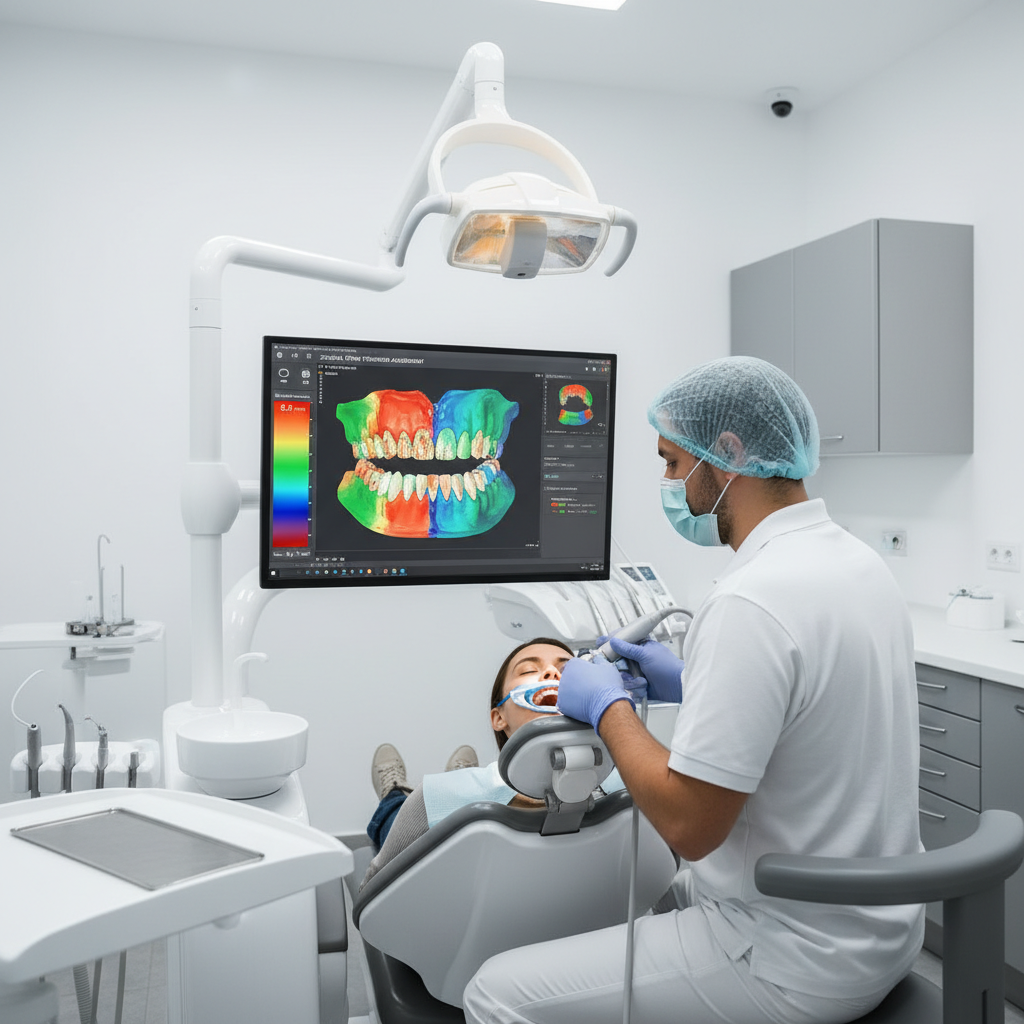
Colour‑coded clearance maps make zirconia crown thickness visible before the case leaves the chair.
Use clearance / reduction maps
Many systems colour‑code clearance between the prep and opposing dentition. If red or “zero space” patches sit on your functional cusp tips or incisal edges, any zirconia crown designed here will be thin in exactly the wrong place.
Make it a habit to check:
- Posterior monolithic cases: does the map show at least 1.0 mm everywhere in function, and closer to 1.5 mm where loads peak?
- Translucent or layered zirconia: are you consistently seeing 1.2–1.5 mm over the aesthetic zone?
When space is short: options before you scan
If the map shows thin areas, consider whether to:
- Selectively reduce the opposing tooth instead of over‑cutting the prep.
- Choose a different material (e.g. metal occlusal on a full‑coverage tooth) that suits limited space.
- Plan a broader occlusal adjustment or orthodontic intrusion as part of a staged treatment.
If you’re unsure, send NovaDent the prep and pre‑op scans with notes so our team can suggest material and design options that respect realistic thickness.
Make a quick clearance‑map check part of every zirconia scan before you hit “Send”.
For a one‑minute final review, run through the Scanner‑First Zirconia Thickness Checklist below before you submit the case.
Common thickness issues we see at the lab
Working with digital files from clinics across Australia, we see a few thickness patterns repeatedly.
- Under‑reduction on functional cusps: buccal cusps on lower molars and palatal cusps on uppers often give only 0.7–0.8 mm clearance where we need more.
- Knife‑edge lingual margins: thin lingual margins on lower molars or upper premolars scan poorly and leave almost no cervical bulk in zirconia.
- Short clinical crowns: 2–3 mm axial walls with heavy taper force a compromise between retention and material thickness.
- Mixed materials in a segment: a heavily reduced e.max neighbour beside a minimally prepared zirconia crown can leave the zirconia looking bulky or under‑contoured.
If you find you’re consistently shaving a lot off zirconia crowns at fit, preps are usually undershooting the thickness targets above; a quick discussion with our technicians and a few shared scanner screenshots via our scan review support is often enough to reset the workflow.
Working with NovaDent on zirconia and scanners
NovaDent Labs is built around digital workflows, so we work with STL/PLY scans from all major intraoral scanners to design zirconia restorations that fit predictably. You can see how we use zirconia across crowns, bridges, multilayer cases, and full‑arch work on our zirconia prosthetics page, explore our broader services on the For Dentists overview, and flag case‑specific questions when you submit your scan via the online RX form.

Digital collaboration on zirconia crown thickness between your intraoral scanner and NovaDent’s lab team.
- Helping you choose between high‑strength and translucent zirconia based on available space, load, and aesthetic demands.
- Reviewing pre‑op and prep scans to suggest where extra reduction will protect thickness without unnecessary tooth removal.
- Using consistent CAD settings for cement space, occlusal relief, and connector dimensions so your crowns behave similarly case after case.
Recent internal zirconia QA data at NovaDent show customer satisfaction rates around 99%, most reliably when the thickness and scanner checks in this guide are followed.
Scanner‑First Zirconia Thickness Checklist
Use this quick, chairside checklist in under a minute before you submit the scan:
- On your scanner’s clearance map, posterior monolithic zirconia shows ~1.0–1.5 mm everywhere in function.
- For translucent or layered zirconia, occlusal/incisal thickness reads closer to 1.2–1.5 mm in the main load‑bearing areas.
- Axial walls are about 1.0 mm (or ≥1.2 mm for implant crowns where occlusal space is tight).
- Finish lines are smooth, rounded, and clearly visible all around the tooth on the 3D scan.
- You’ve captured a clean pre‑op scan or bite that shows the original occlusal scheme for the lab.
- Your lab script notes any known space compromises so design decisions aren’t guesswork.
When those boxes are ticked, scanner‑first zirconia workflows tend to be uneventful in the best way: crowns drop in, need minimal adjustment, and keep their strength where patients actually chew, especially when you note any planned compromises on the online case form.
FAQs: zirconia thickness in scanner‑first workflows
What is a safe minimum occlusal thickness for monolithic zirconia crowns?
As outlined above, aim for around 1.0–1.5 mm occlusal thickness in functional areas for everyday posterior monolithic zirconia, avoiding designs below about 0.8 mm at heavy contacts.
How does recommended thickness change for translucent or aesthetic zirconia?
As outlined above, translucent or highly aesthetic zirconia should be prepared for the higher 1.2–1.5 mm occlusal/incisal and 1.0–1.2 mm axial ranges to preserve strength and appearance.
Can I use knife‑edge margins with zirconia in a digital workflow?
As outlined above, knife‑edge margins are technically possible but scanner‑first workflows are more predictable with a 0.5–0.8 mm rounded chamfer or light shoulder for clearer scans and healthier cervical bulk.
How can my intraoral scanner help prevent thin zirconia crowns?
As outlined above, rely on your scanner’s pre‑op overlay and clearance or reduction maps to confirm the recommended thickness ranges before you submit the case.
This article is intended for registered dental professionals and provides general educational information only. It does not replace manufacturer instructions, formal training, or your own clinical judgement for individual patients.
Related Posts
You may also be interested in

TMJ Splint vs Night Guard: What’s the Difference?
How to Clean a Mouth Guard Properly Without Damaging It
Multi Unit Abutment Explained: Purpose, Benefits & Applications

NovaDent Has Arrived.
Previously VTS Dental Labs.
Same team
Same standards
New identity
Visit our new website