%2520(1).jpeg)
.webp)
When an implant case goes well, it can feel deceptively simple: stable primary fixation, smooth healing, and a prosthesis that drops in. Beneath that ease sits a biologic process that largely determines whether the implant will still be functioning ten or twenty years from now: the osseointegration of dental implants. Understanding how this process unfolds helps you select loading protocols, set realistic timelines with patients, and recognise when a case is drifting off track instead of relying on a single radiograph or torque value.
TL;DR
- Osseointegration is a direct structural and functional connection between living bone and a load bearing implant surface, with no intervening soft tissue
- Healing passes through predictable phases: clot formation, inflammation, early woven bone, and longer term bone remodelling around the implant surface
- For most straightforward cases, bone integration takes roughly 3–6 months, with longer timelines in grafted sites and the posterior maxilla
- Key success factors lie in patient selection, atraumatic technique, primary stability, appropriate loading and controlled occlusion.
- A digital focused lab supports osseointegration through accurate emergence profiles, passive fit, and prosthetic designs that respect bone and soft tissue biology.
What is osseointegration in implant dentistry?
In simple terms, osseointegration means that bone grows right up to the implant surface and locks it in place, so that under function the interface behaves as a single unit. Histologically, that implies direct bone to implant contact without an intervening fibrous layer, and clinically it expresses as a stable, asymptomatic implant with no radiolucent zone, consistent with definitions in the standard osseointegration article.
Brånemark’s work in the 1960s established the concept. Modern surface treatments and implant designs now aim for both rapid initial osseointegration and a stable corticalised bone shell around the neck to support long term crestal bone levels, a goal reflected across modern osseointegration literature.
Why osseointegration matters for long term implant success
A clinically “quiet” implant in the first months does not guarantee success over decades. Using criteria from Albrektsson and colleagues immobility, absence of radiolucency, limited marginal bone loss and no persistent pain or infection systematic reviews and long term cohort data report cumulative 10 year implant survival rates around 93–97% in well maintained patients, even though biological and technical complications still accumulate over time, as outlined in this classic implant success paper and this systematic review of bone and tissue level implants.
For restorative and lab planning, understanding how well bone has adapted guides when you move from healing abutments to definitive prosthetics, whether to stage loading, and how assertively to shape occlusion. It also influences decisions on cantilever lengths, connector dimensions and material selection for frameworks and crowns.
“Osseointegration is a dynamic, staged process not a yes/no event on crown day.”
Biological stages and steps of osseointegration
While every patient heals differently, the biology follows a fairly consistent sequence. Thinking in stages helps link what you see clinically with what is happening at the bone implant interface.
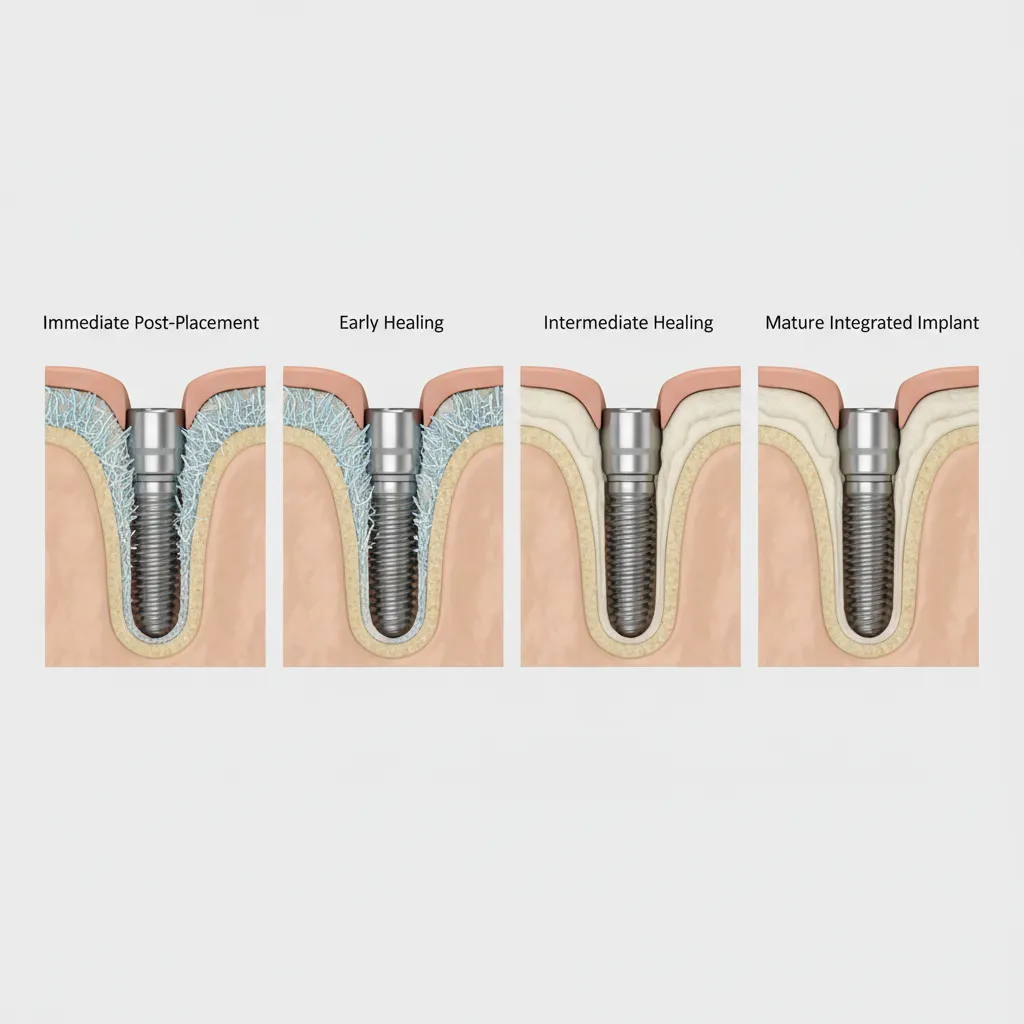
Figure 1. Indicative timeline of osseointegration stages: day 0–3 (blood clot and primary stability), day 1–7 (inflammatory phase), week 1–4 (early woven bone) and month 2–6+ (lamellar remodelling and functional loading).
Stage 1: Blood clot and initial stability (day 0–3)
- Immediately after placement, a blood clot and fibrin network form around the implant and within the osteotomy, stabilising the area and acting as a scaffold for inflammatory and progenitor cells.
- Primary stability at this point is mechanical, driven by implant design, bone density and insertion torque rather than true biologic integration, as highlighted in this overview of implant healing stages.
Stage 2: Inflammatory phase (day 1–7)
- Neutrophils and macrophages clear debris and signal tissue repair, while early angiogenesis re‑establishes a microvascular network around the osteotomy walls.
- Excessive micromotion at the interface can push healing toward fibrous encapsulation rather than direct bone contact, a risk described in reviews of osseointegration mechanics.
Stage 3: Early bone formation (week 1–4)
- Mesenchymal stem cells differentiate into osteoblasts that lay down woven bone along the implant surface and within the defect; bone fill increases, but this immature bone has lower stiffness and is more vulnerable to overload.
- Clinically, insertion torque may drop slightly as mechanical stability transitions toward biologic stability, as described in this implant healing overview.
Stage 4: Bone remodelling and maturation (month 2–6+)
- Woven bone is remodelled into lamellar bone with more organised trabeculae and a denser cortical shell around the implant; the proportion of direct bone to implant contact increases and functional load helps orient trabeculae along stress lines.
- Most routine cases reach a stable plateau of osseointegration over the first few months after placement, although high risk or heavily grafted sites may take longer, according to this clinical healing guide.
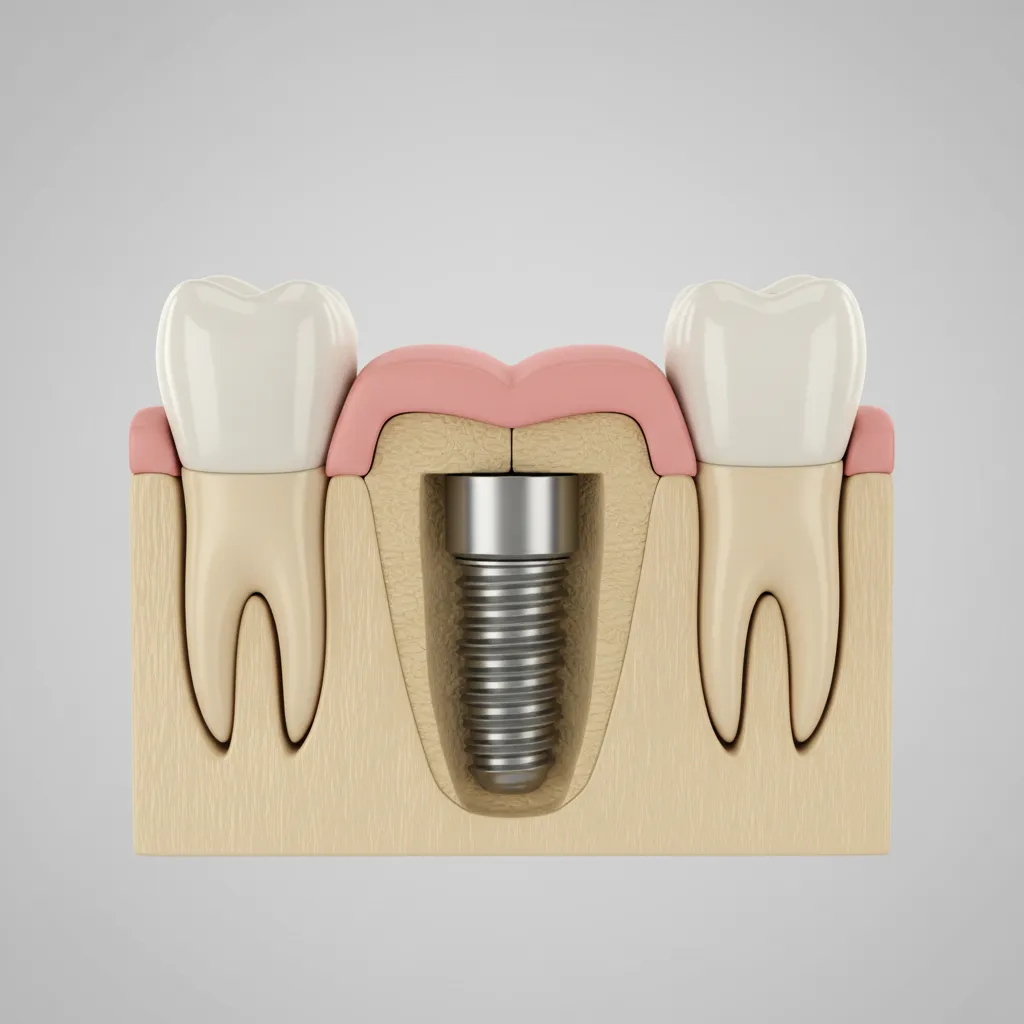
Figure 2. Schematic cross‑section of the implant bone interface comparing early porous woven bone with later organised lamellar and cortical bone after remodelling.
Key steps in the osseointegration of dental implants (clinician’s view)
In daily practice, the practical steps of osseointegration of dental implants look like this:
- Treatment planning and risk assessment based on medical history, site evaluation and restorative plan.
- Surgical placement with atraumatic technique and targeted primary stability.
- Protection of the healing site (soft tissue closure or transmucosal healing, patient instructions).
- Monitoring during the integration window (clinical checks, radiographs where indicated, ISQ where available).
- Transition to prosthetic loading with a design that respects bone quality and support.
For treatment planning, understanding these steps makes it easier to align your surgical, prosthetic and maintenance decisions with the underlying biology.
Typical healing times and timelines
Clinicians and patients often ask, “How long until this implant is ready to load?” It depends on biology, site and mechanics, but we can outline broad ranges supported by the literature, including this implant healing stages guide.
Soft tissue healing vs. bone healing
- Soft tissue: Gingival healing usually settles within 1–3 weeks with good plaque control and no flap complications, similar to timelines described in this patient facing healing overview.
- Bone / osseointegration: Bone integration continues quietly for months, with most sources placing functional integration for standard titanium implants in the 3–6 month range, as reflected in the same implant healing reference.
Mandible vs. maxilla and grafted sites
- Dense anterior mandible: Often suitable for shorter integration intervals and earlier loading in well selected cases.
- Posterior mandible: Usually suits conventional integration windows; short implants or heavy occlusal loads may justify extra caution.
- Anterior maxilla: More cancellous bone and aesthetic demands often push healing plans toward the middle of the integration range.
- Posterior maxilla: Lower bone density and sinus anatomy commonly require longer healing windows, especially after sinus augmentation, as described in general dental implant overviews.
- Grafted sites: Horizontal or vertical augmentation often calls for extended integration periods to allow graft consolidation and remodelling before full loading, echoed in standard implant dentistry references.
Indicative osseointegration timelines by site
The table below summarises conservative, approximate ranges for typical cases; use them as a starting point and adjust for patient risk, implant system and loading protocol.
| Site / condition | Indicative integration window* | Comments |
|---|---|---|
| Anterior mandible (non-grafted) | ~3–4 months | High-density bone; some cases may suit earlier progressive loading with strong primary stability. |
| Posterior mandible (non-grafted) | ~3–5 months | Watch occlusal load and implant length. |
| Anterior maxilla (non-grafted) | ~4–6 months | Balance aesthetics, soft tissue maturation and bone density. |
| Posterior maxilla (non-grafted) | ~4–6+ months | Lower density bone; consider longer intervals in high-load or multi-unit cases. |
| Grafted sites (ridge augmentation or sinus lift) | ~6–9+ months | Allow for graft integration and remodelling before full functional loading. |
Case example: grafted posterior maxilla
A 55 year old non smoker received an implant in a sinus lifted, grafted posterior maxilla with good primary stability. The fixture was left unloaded for eight months, then restored with light centric contacts only once symptoms, soft tissues, radiographs and ISQ values all suggested stable bone.
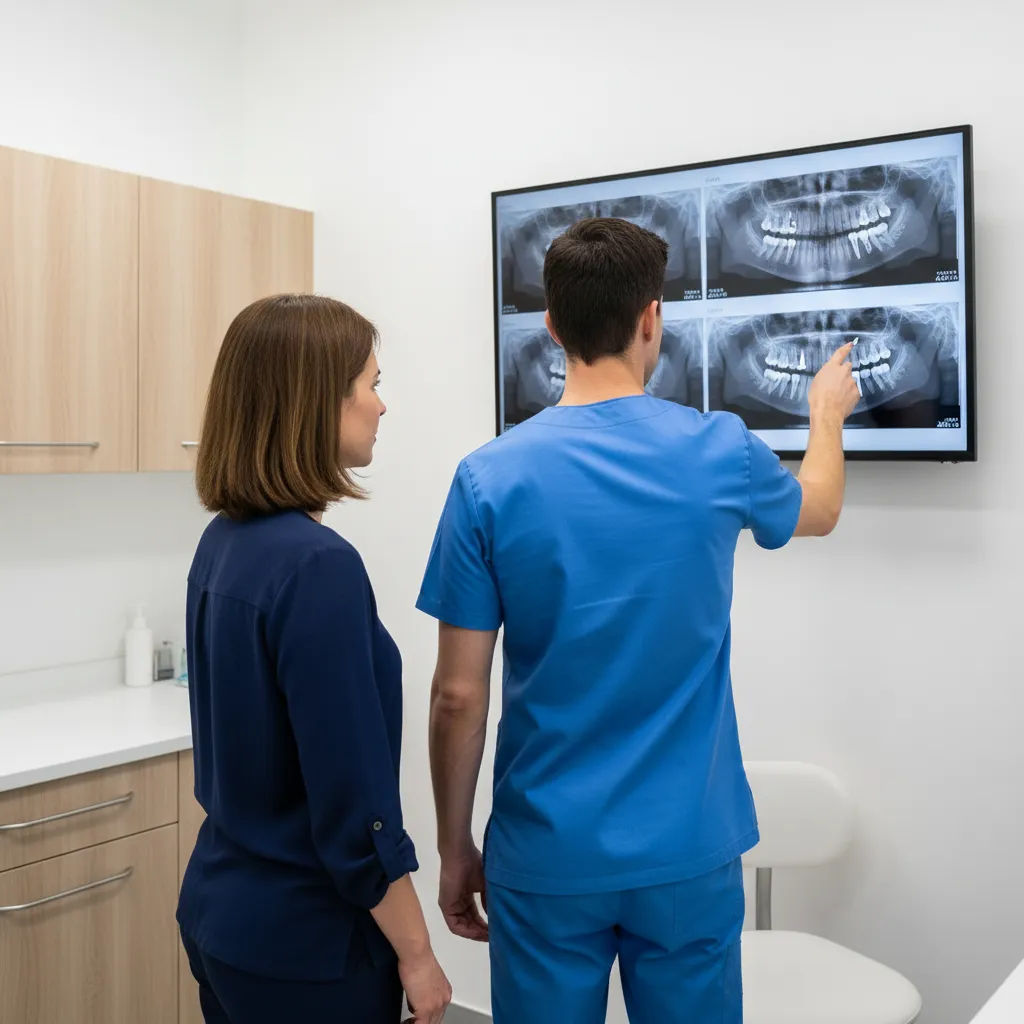
Figure 3. Radiograph sequence for a grafted posterior maxilla implant showing progressive bone fill and corticalisation of the sinus floor over the integration period.
Clinical success factors for osseointegration
Long term success rarely hinges on a single decision; it is the sum of many small choices. Key influences include:
Patient and systemic factors
- Systemic risk profile: glycaemic control in diabetes, smoking status, relevant medications (for example, anti-resorptives) and any head and neck radiotherapy.
- History of periodontitis, oral hygiene capacity and willingness to attend supportive care.
Meta analyses suggest smokers and patients who have received head and neck radiotherapy have roughly double the implant failure risk of healthy non-smokers, underscoring the need for strict case selection and maintenance in these cohorts, as discussed in this systematic review of implant failure risk factors.
Local anatomy and site preparation
- Bone quantity and quality, cortical thickness and proximity to anatomic structures, sometimes requiring staged grafting, sinus elevation or ridge preservation.
- An osteotomy protocol that respects bone biology and limits thermal trauma, in line with practical recommendations in implant healing guides.
In compromised ridges or high risk aesthetic zones, carefully contoured customised abutments can also help support soft tissue and distribute load more favourably during and after osseointegration.
Implant design and surface
- Macro geometry that balances primary stability with favourable stress distribution.
- Surface topography and chemistry that support early bone apposition and vascular ingrowth, as explored in recent research on implant surface treatments and peri implant bone healing.
- Platform switching and connection design that influence crestal bone behaviour.
Loading protocol and occlusion
- Selection between immediate, early or delayed loading based on primary stability, bone quality and parafunction risk, as outlined in standard dental implant references.
- Occlusal scheme that limits lateral overload, especially for cantilevers and short implants.
- Prosthetic contours that respect peri implant soft tissue and facilitate plaque control, reducing peri implantitis risk discussed in peri implant disease literature.
Practical steps: The 5 Step Osseointegration Support Checklist
Here is a concise, five step checklist you can run through from planning to maintenance for each implant case.
- Plan restoratively first. Start with the desired crown position and use CBCT with digital wax ups or guided surgery, planned via our digital dentistry resources, so implant position matches restorative needs.
- Set a realistic timeline. For each site, agree with the patient on a healing window that reflects local bone quality (for example, dense anterior mandible versus grafted posterior maxilla) and explain it may change if healing is slower than expected.
- Protect primary stability. Once the implant is in, respect the early healing phase: limit unnecessary disturbance of the site and keep provisional restorations out of heavy occlusion.
- Monitor, do not rush. Use follow ups at 1–2 weeks and at key milestones (for example, 3 and 6 months) to review symptoms, soft tissues and radiographs rather than working off the calendar alone, consistent with recommendations in literature on peri implant monitoring.
- Design for bone and maintenance. Work with your lab on emergence profiles, contact points and occlusal schemes that respect bone support and cleansability, and enrol patients into recalls with peri implant probing, radiographs as indicated and reinforcement of hygiene and risk factor control, echoing long term maintenance principles in peri implant care reviews.
How a digital implant lab supports stable osseointegration
Osseointegration is biologic, but the prosthetic phase can either support it or slowly undermine it; a lab with strong digital workflows helps stack the odds in your favour.
- Accurate fit and passive frameworks. CAD/CAM frameworks verified on models help minimise micro movement at the implant abutment interface and reduce the risk of mechanical overload on bone.
- Emergence profiles that respect soft tissue. Properly contoured custom abutments and provisional crowns help shape a healthy cuff of keratinised tissue while keeping access for cleaning, supporting a stable permucosal seal across our implant restoration services.
- Occlusal schemes designed with risk in mind. Digital articulation and cross arch planning allow the lab to shorten cantilevers, balance contacts and preemptively reduce lateral load before you seat the case.
- Consistent communication. Clear lab sheets, shared digital records and photos let the lab flag discrepancies between the restorative plan and what the bone and soft tissue are likely to tolerate.
If you are looking for a lab partner that shares responsibility for your implant outcomes, learn more about NovaDent Labs on our home page, request a price list, or explore complex cases in our testimonials and case studies section.
FAQs
How long does osseointegration of dental implants usually take?
In straightforward cases in healthy patients with good bone quality, osseointegration typically takes about 3–6 months before full functional loading, with longer timelines in grafted or low density maxillary sites, as reflected in this implant healing overview. Always interpret the calendar in light of your clinical findings.
What are the main osseointegration stages clinicians should think about?
In practice, it helps to think about four broad stages: (1) blood clot and primary stability, (2) inflammatory response with early vascular ingrowth, (3) woven bone formation, and (4) remodelling into mature lamellar and cortical bone around the implant.
Can you load an implant before full osseointegration?
Immediate and early loading protocols can succeed when case selection, primary stability and occlusal control are favourable, but they carry a narrower margin for error. Many clinicians reserve immediate loading for splinted or full arch restorations with high insertion torque and strong cross arch support, and use early or delayed loading for higher risk sites.
How do you know if osseointegration has failed?
Classic signs include implant mobility, persistent pain, radiolucency around the fixture, and progressive bone loss that does not stabilize with local therapy. In Albrektsson’s framework these are recorded as failures rather than simply “bone loss,” as discussed in this foundational success criteria paper. Early detection improves your ability to intervene before extensive hard tissue loss; for more on prosthetic design and monitoring in complex cases, see our full mouth rehabilitation guide.
Related Posts
You may also be interested in
.png)
How to Find a Premium Dental Lab

Dental Implant Care: The Tooth May Be Artificial, But the Care Is Real
TMJ Splint vs Night Guard: What’s the Difference?
NovaDent Has Arrived.
Previously VTS Dental Labs.
Same team
Same standards
New identity
Visit our new website